Resistance bands can build stronger glutes if you use exercises that challenge hip extension and hip abduction, train consistently, and make the work harder over time. A useful routine should include more than lateral walks and kickbacks: combine a squat or lunge, a hip hinge, a bridge or hip thrust, and one or two abduction exercises.
You do not need to complete every exercise in this guide during one session. Choose four to six movements that match your equipment and ability, then track your repetitions and band resistance. The two workouts below provide a ready-to-use starting point.
Can Resistance Bands Build Your Glutes?
Yes. Resistance bands can help build glute strength and muscle when the exercises are challenging, the weekly workload is appropriate, and resistance increases as you improve. Their main limitation is that strong trainees may eventually need heavier bands, free weights, or machines to keep progressing efficiently.
A systematic review found that elastic resistance and conventional resistance training produced similar strength improvements across the included studies, although protocols and participant groups varied. That does not mean every band exercise equals a heavy barbell exercise. It shows that elastic resistance can be a valid training method when it provides an adequate challenge. Read the systematic review and meta-analysis.
The American College of Sports Medicine’s 2026 resistance-training guidance also recognizes bands, bodyweight, and home-based training as effective options. The larger lesson is practical: consistency and progressive effort matter more than using a complicated program or a particular type of equipment. See the ACSM resistance-training guidance.
For muscle growth, a band should make the final repetitions of a set noticeably slower while your technique remains controlled. If you can perform 30 or 40 easy repetitions and stop only because you are bored, the exercise is probably too light to be an efficient main strength movement.
What the Glute Muscles Do
The glutes include three overlapping muscles with related but different functions.
| Muscle | Important functions | Useful exercise patterns |
|---|---|---|
| Gluteus maximus | Extends the hip and assists external rotation | Bridges, hip thrusts, RDLs, squats, lunges, and good mornings |
| Gluteus medius | Abducts the hip and helps control the pelvis during single-leg tasks | Lateral walks, standing abduction, clamshells, and lunges |
| Gluteus minimus | Assists hip abduction and pelvic control | Abduction exercises and single-leg movements |
No exercise completely isolates one glute muscle. Compound exercises also train the quadriceps, hamstrings, adductors, and trunk. That shared work is useful, not a flaw.
Mini Bands vs. Long Resistance Bands
Use a mini loop for outward-knee or side-to-side resistance and a long loop or handled tube when you want to load a squat, hinge, or lunge. Owning both makes exercise selection easier, but either type can support a useful beginner workout.
| Band type | Best uses | Main limitation |
|---|---|---|
| Mini loop or fabric “booty band” | Lateral walks, clamshells, seated abduction, fire hydrants and knee-banded bridges | Usually cannot provide substantial direct resistance to standing hip extension |
| Long loop band | Squats, RDLs, good mornings, lunges and some hip-thrust setups | Can slip or recoil if setup is poor |
| Tube with handles | Squats, RDLs, kickbacks and general full-body training | Handles and fixed length may limit some lower-body setups |
A mini band around your thighs during a squat pulls the knees inward. Resisting that pull adds hip-abduction demand, but it does not directly increase the vertical load you must lift. To make the upward phase harder, stand on a long band and hold or loop the other end securely at shoulder level.
Band colors are not standardized. A green band from one company may not match a green band from another. Band tension also rises as the material stretches, and the relationship between stretch and force differs by product. Use the manufacturer’s resistance information as a starting point, then judge the band by your form and effort. Research on elastic-band elongation and tension.

- High End Exercise Bands. Our 12″³ By 2″³ Heavy Duty Loop Resistance Bands Come In 5 Varying Resistance Levels. This Make…
- Great With Any Workout. This Resistance Band Set Can Be Integrated Seamlessly With Various Popular Workout Program. Or U…
- Multiple Uses. While These Resistance Bands Are Often Used For Sports And Fitness, Physical Therapists Love These Physic…

- 100% Natural Latex
- 【Natural Latex & Durable Elasticity】Our pull up bands are made of 100% natural Malaysia latex, making these resistance b…
- 【Multifunctional Exercise Bands】These exercise bands add effective resistance and weight to your workouts, ideal for pul…
The 12 Best Resistance Band Glute Exercises
The best selection covers several movement patterns rather than repeating the same small-range abduction exercise. Start with the compound exercises, then use one or two accessories to complete the session.
1. Long-Band Squat
The long-band squat trains the glutes and quadriceps through a familiar sit-and-stand pattern. Unlike placing a mini band around the knees, standing on a long band creates direct resistance as you rise.
How to do it:
- Stand near the center of a long loop band with your feet about shoulder-width apart.
- Hold the other side at your shoulders. Keep it in your hands rather than wrapping it tightly around your neck.
- Brace your trunk and sit down between your hips while keeping your full foot on the floor.
- Descend as far as you can without pain, heel lift, or loss of trunk control.
- Push through the floor and stand tall without forcefully leaning backward.
Start with 2–3 sets of 8–15 repetitions.
Common mistake: Choosing a band that pulls the torso forward or prevents a controlled bottom position. Use a lighter band or reduce the depth while you improve mobility and control.
Make it easier: Perform a band-free box squat on a stable chair.
Make it harder: Use a stronger band, add repetitions, or progress to a split squat.
2. Resistance Band Romanian Deadlift
The resistance band Romanian deadlift, or RDL, is a primary hip-hinge exercise for the glutes and hamstrings. It teaches you to move the hips backward while keeping the spine controlled.
How to do it:
- Stand in the middle of a long loop or tube band with your feet approximately hip-width apart.
- Hold the band ends with your arms long. Start tall with a slight bend in your knees.
- Push your hips backward as if closing a car door behind you.
- Lower until you feel tension through the glutes and hamstrings or before your back position changes.
- Drive your feet into the floor and bring your hips forward to stand.
Start with 2–4 sets of 8–15 repetitions.
Common mistake: Turning the movement into a squat by bending the knees excessively. Keep the shins relatively vertical and let the hips travel backward.
Make it easier: Practice the hip hinge without a band while keeping a hand on the front of your hip crease.
Make it harder: Use a stronger band, increase starting tension, or try a staggered-stance RDL.
3. Banded Glute Bridge
The banded glute bridge trains hip extension on the floor and is suitable for most beginners. A mini band above the knees mainly adds outward-knee resistance; bodyweight still supplies most of the hip-extension challenge.
How to do it:
- Place a mini band a few inches above your knees and lie on your back.
- Bend your knees and set your feet about hip-width apart.
- Gently brace your abdomen and keep your ribs from flaring upward.
- Press through your feet, maintain light outward tension on the band, and lift your hips.
- Stop when the hips are extended without arching the lower back, then lower under control.
Start with 2–3 sets of 10–20 repetitions.
Common mistake: Chasing extra height by overextending the lower back. Finish each repetition by squeezing the glutes while keeping the rib cage and pelvis controlled.
Make it easier: remove the mini band or shorten the range.
Make it harder: Pause for two seconds at the top, use a single-leg variation, or add an appropriate external load.
4. Banded Hip Thrust
The hip thrust uses the same hip-extension pattern as a bridge but places the upper back on a stable bench or couch, allowing a larger range of motion. It can work well, but a floor bridge is the safer choice if you do not have secure support.
How to do it:
- Sit on the floor with your upper back against a stable bench and place a mini band above your knees.
- Plant your feet about hip-width apart and keep your chin gently tucked.
- Maintain outward pressure against the band as you drive your hips upward.
- Stop with the torso approximately parallel to the floor and the hips fully extended.
- Lower slowly while keeping your feet and support stationary.
Start with 2–4 sets of 8–20 repetitions.
Common mistake: Using an unstable chair that can slide or tip. Test the support before starting and use the floor bridge when uncertain.
Make it easier: Use a glute bridge.
Make it harder: Add a pause, progress to one leg, or use a purpose-built and securely anchored resistance setup.
A nine-week study in previously untrained adults found similar gluteal growth from barbell squats and hip thrusts when set volume was matched. It also found that greater muscle activity measured during one session did not consistently predict the later growth response. The study used barbells rather than bands, but it supports using more than one sound hip-extension or squat pattern instead of searching for a single “perfect” exercise. Read the peer-reviewed study.
5. Supported Band Reverse Lunge
The supported reverse lunge trains each leg separately and challenges the glutes, quadriceps, and pelvic stabilizers. Holding a wall or sturdy support reduces the balance demand so the working leg can receive more attention.
How to do it:
- Stand on the center of a long band with the working foot and hold the band at shoulder level on the same side.
- Lightly hold a stable support with your free hand.
- Step the opposite leg backward and lower both knees through a comfortable range.
- Keep most of your pressure through the front foot.
- Push the floor away with the front leg and return to standing.
Start with 2–3 sets of 8–15 repetitions per side.
Common mistake: Taking such a narrow step that balance, rather than leg strength, limits the set. Keep some side-to-side space between your feet.
Make it easier: Perform a supported split squat without a band.
Make it harder: Increase resistance or use a slower lowering phase.
6. Resistance Band Good Morning
The band good morning is another hip-hinge option for the glutes and hamstrings. Because the resistance acts farther from the hips, a modest band can feel challenging.
How to do it:
- Stand on a long looped band with both feet.
- Hold the opposite side securely against the fronts of your shoulders with both hands.
- Soften your knees, brace your trunk, and push your hips backward.
- Stop before your back position changes or the band begins to slip.
- Squeeze the glutes and stand tall.
Start with 2–3 sets of 10–15 repetitions.
Common mistake: Looping the band loosely around the back of the neck. Keep it controlled in your hands at the shoulders so you can release tension safely if needed.
Make it easier: Use a bodyweight hinge or an RDL with the band held in your hands.
Make it harder: Use a stronger band or pause in the stretched position while maintaining control.
7. Lateral Band Walk
The lateral band walk trains hip abduction and challenges the glutes to control the pelvis and thighs as you step sideways. It works well as a short accessory exercise or warm-up, but it should not replace all your squats, hinges, and bridges.
How to do it:
- Place a mini band above your knees. This position is easier to control than the ankles or feet.
- Stand with your feet about hip-width apart and keep slight tension on the band.
- Bend your knees slightly and hinge forward a small amount.
- Step sideways without rocking the torso or dragging the trailing foot.
- Complete the same number of controlled steps in both directions.
Start with 1–3 sets of 10–20 steps per direction.
Common mistake: Letting the feet snap together between steps. Maintain a controlled hip-width stance so the band does not go completely slack.
Moving the band from the knees toward the ankles or feet can increase gluteal muscle activity, but the longer lever also makes the movement harder and may reduce control. Start above the knees, then move it lower only if you can keep your knees and pelvis steady. See the band-placement study.
8. Seated Band Hip Abduction
Seated band abduction offers a stable way to train the outer glutes without balance limiting the set. It is best used after larger compound movements.
How to do it:
- Sit near the edge of a sturdy chair with a mini band above your knees.
- Keep both feet flat and place your knees approximately over your feet.
- Sit tall or lean forward slightly from the hips.
- Press your knees apart without rolling onto the outside edges of your feet.
- Return slowly rather than allowing the band to pull the legs together.
Start with 2–3 sets of 12–25 repetitions.
Common mistake: Using rapid partial repetitions only to create a burning sensation. Use a range you can control and make the band stronger when high repetitions become easy.
9. Banded Clamshell
The clamshell is a low-impact side-lying exercise for hip abduction and rotation. It is useful for beginners who struggle to keep the pelvis still during standing band exercises.
How to do it:
- Place a mini band above your knees and lie on your side with your hips and knees bent.
- Stack your hips and keep your feet together.
- Open the top knee without rolling your pelvis backward.
- Pause briefly, then lower the knee under control.
- Finish the set before switching sides.
Start with 2–3 sets of 12–20 repetitions per side.
Common mistake: Rotating the entire trunk to create more range. A smaller motion with a still pelvis is usually more productive.
Make it easier: Remove the band.
Make it harder: Use a stronger band or progress to a controlled side plank with abduction if appropriate.
10. Standing Band Kickback
The standing kickback trains hip extension one side at a time with minimal knee movement. It is an accessory exercise, so use it after squats, hinges, or lunges rather than treating it as the entire workout.
How to do it:
- Place a mini band around your ankles or use an ankle attachment designed for a handled tube.
- Hold a stable support and shift your weight onto one leg.
- Slightly bend the standing knee and brace your trunk.
- Move the working leg backward without arching your lower back or rotating the pelvis.
- Return slowly and complete all repetitions before switching sides.
Start with 2–3 sets of 10–20 repetitions per side.
Common mistake: Swinging the leg far behind the body by extending the spine. Use a smaller hip-driven range and keep the torso quiet.
11. Banded Fire Hydrant
The fire hydrant trains hip abduction from a hands-and-knees position. The floor removes the balance challenge, making it easier to focus on pelvic control.
How to do it:
- Place a mini band above your knees and begin on your hands and knees.
- Brace gently and keep your hips level with the floor.
- Lift one knee out to the side without shifting your whole body away from it.
- Stop before the pelvis rotates, then lower slowly.
- Repeat on the opposite side.
Start with 2–3 sets of 12–20 repetitions per side.
Common mistake: Opening the hip as far as possible while the trunk twists. Controlled range matters more than height.
12. Single-Leg Band Glute Bridge
The single-leg bridge makes the bridge pattern harder without requiring a stronger band. It also reveals side-to-side differences, although small differences are normal.
How to do it:
- Place a mini band above your knees and set up as you would for a standard bridge.
- Bring one knee toward your torso while keeping the thighs separated against the band.
- Brace and push through the planted foot.
- Lift the hips without allowing the pelvis to rotate.
- Lower under control and complete the set before changing sides.
Start with 2–3 sets of 8–15 repetitions per side.
Common mistake: Starting this progression before you can perform a controlled two-leg bridge. Build the basic pattern first.
Two Resistance Band Glute Workouts
Train the glutes with four to six exercises per session rather than completing all 12 movements. Most beginners can start with one or two glute-focused sessions per week, separated by at least a day, while considering the lower-body work already performed in other workouts.
Workout A: Mini-Band Glute Workout at Home
This 20-minute routine works when a mini loop is your only equipment. It combines bridges with abduction exercises, but its loading options are more limited than the long-band workout.
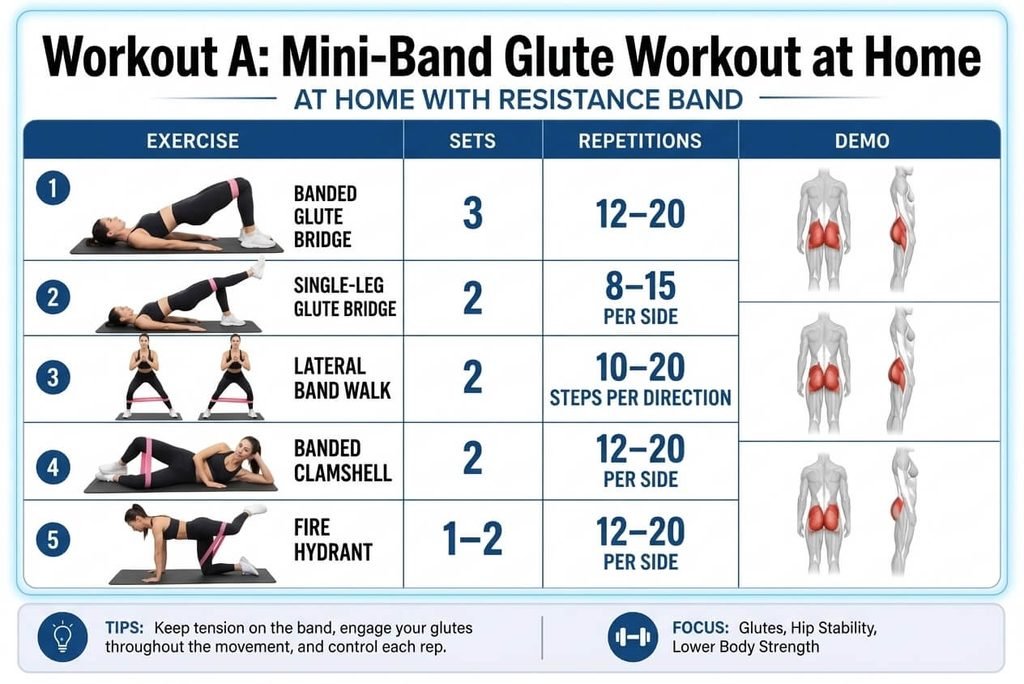
Rest about 45–90 seconds between sets. If this is your first week, perform two sets of the bridge and one set of each remaining movement. Add work gradually rather than trying to create maximum soreness.
Workout B: Long-Band Glute Strength Workout
This 25- to 35-minute workout provides more direct resistance for squatting and hip extension. Use a band that lets you finish each set with controlled technique and approximately one to three good repetitions remaining.
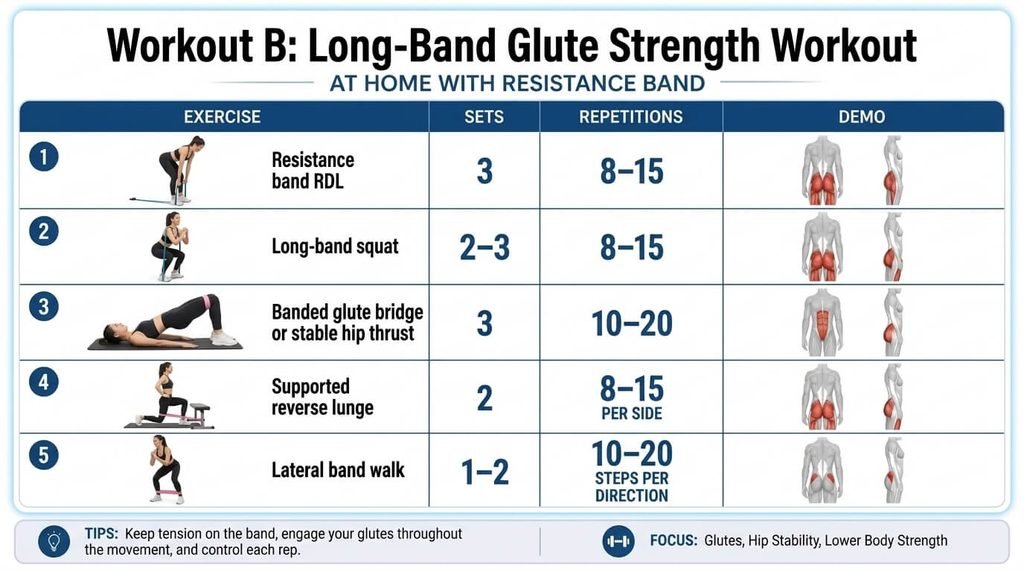
Rest 60–120 seconds after RDLs, squats, and lunges. Rest 45–90 seconds after bridges and lateral walks. Longer rest is appropriate if breathing or balance would otherwise limit the next set.
Optional Four-Minute Warm-Up
A warm-up should prepare you, not exhaust you. Complete one easy round of the following:
- 8–10 bodyweight squats
- 8–10 glute bridges
- 8 controlled hip hinges
- 8–10 lateral steps per direction
Glute “activation” is not a special biological switch. These drills may help you rehearse the movements and feel more prepared, but they are optional if your regular warm-up already does that job.
How to Progress Your Resistance Band Glute Training
Progress when you reach the top of the repetition range with steady technique and still have several repetitions available. Change one variable at a time so you can tell whether the program is becoming more demanding.
Use this progression order:
- Improve control and range. Make every repetition consistent before chasing more resistance.
- Add repetitions. Move from the bottom toward the top of the prescribed range.
- Increase band resistance. Select a stronger band when the top of the range becomes comfortable.
- Increase safe starting tension. Adjust your grip or stance only when the manufacturer permits it and the band remains secure.
- Add one set. Add volume only if you are recovering well and need more work.
- Use pauses or slower lowering. A one- or two-second pause can make a light band more challenging without adding many repetitions.
- Choose a unilateral variation. Progress from a bridge to a single-leg bridge or from a squat to a supported split squat.
- Add other resistance. Dumbbells, a loaded backpack, or gym equipment may become useful once bands no longer provide an efficient challenge.
Simple Progression Example
Suppose your target for band RDLs is three sets of 8–15:
| Session | Repetitions | Next step |
|---|---|---|
| 1 | 12, 11, 10 | Keep the same band and add reps |
| 2 | 13, 12, 11 | Keep progressing |
| 3 | 15, 14, 13 | Try to complete the range |
| 4 | 15, 15, 15 | Use a slightly stronger band next time |
| 5 | 11, 10, 9 with stronger band | Build back toward 15 |
Track the band brand, color, or label, exercise setup, sets, and repetitions. “Medium band” is too vague if you own several sets from different manufacturers.
Common Resistance Band Glute Training Mistakes
Most problems come from poor band selection, rushed repetitions, or using only small accessory movements. Correcting these issues makes the workout easier to measure and progress.
Using Only Lateral Walks and Kickbacks
Abduction and kickback exercises can complement a program, but they provide an incomplete training stimulus on their own. Include a hinge, squat or lunge, and bridge or hip thrust when your goal is general glute strength or muscle growth.
Assuming More Burn Means More Growth
High-repetition mini-band work often creates a strong local burning sensation. That sensation can occur during a useful set, but it is not a direct measure of muscle growth. Progress in resistance, repetitions, range, and technique is more informative.
Treating a Knee-Banded Squat as a Heavily Loaded Squat
A mini band around the thighs challenges the outward position of the knees; it does not add much direct resistance to standing. Use a long band under the feet when you want elastic resistance against the upward movement.
Allowing the Band to Control the Return
Do not let the band snap your legs or arms back to the starting position. The lowering or returning phase is part of the repetition. Control it.
Progressing Every Variable at Once
Adding reps, sets, a stronger band, a slower tempo, and a harder exercise simultaneously makes fatigue jump unpredictably. Adjust one variable, observe your recovery and technique, then progress again.
Training Through Sharp or Worsening Pain
Muscular effort and fatigue are expected, but sharp, radiating, or progressively worsening pain is a reason to stop. Change the exercise or range, and consult a qualified healthcare professional when pain persists or when you are returning after an injury.
Band Safety Checklist
Resistance bands are simple equipment, but stretched elastic can recoil quickly if it breaks or slips.
- Inspect the entire band for cuts, cracks, thinning, damaged stitching, or worn attachment points.
- Follow the manufacturer’s instructions and replacement guidance.
- Keep your face and eyes outside the band’s recoil path.
- Test every setup with light tension before beginning a work set.
- Do not place bands over sharp, rough, or hot surfaces.
- Use stable footwear and a clean floor when standing on a band.
- Make sure benches, chairs, and other supports cannot slide or tip.
- Avoid improvised door or furniture anchors that are not designed to withstand elastic resistance.
- Replace a questionable band rather than attempting to repair it.
Frequently Asked Questions
What is the best resistance band exercise for glutes?
There is no single best exercise for every goal. A long-band RDL, squat, bridge, or hip thrust provides a strong foundation for hip extension, while lateral walks or abductions complement those movements. A balanced workout uses several patterns.
Can resistance bands grow your glutes without weights?
Yes, especially for beginners and people returning to training. The band must make the target repetition range challenging, and the program must progress. Stronger trainees may eventually find that bands alone are inconvenient or too light for efficient muscle growth.
How often should I do resistance band glute exercises?
One or two focused sessions per week is a practical beginner starting point. Count squats, lunges, deadlifts, step-ups, and other lower-body work from the rest of your program. Add frequency only if performance and recovery remain good.
How many sets and repetitions should I perform?
Start with about two sets per exercise and four or five exercises per session. Most compound band exercises work well for roughly 8–15 repetitions, while lighter abduction movements may suit 12–25. The end of the set should feel challenging without forcing sloppy repetitions.
Is a mini band or a long resistance band better for glutes?
A long band is generally better for directly loading squats, hinges, and lunges. A mini band is more convenient for abduction exercises and for adding outward-knee resistance. Using both provides the widest range of options.
Where should I place a mini band?
Place it above the knees for bridges, clamshells, fire hydrants, and beginner lateral walks. An ankle or foot position makes lateral walking harder, but it also increases the leverage and control demands. Never place a band directly over a painful joint or irritated skin.
Do bands around the knees make squats harder?
They make it harder to maintain an outward knee position, but they do not substantially increase the load required to stand. For direct squat resistance, use a long band under your feet and hold it securely near your shoulders.
Are lateral band walks enough to build glutes?
Lateral walks can strengthen hip-abduction and pelvic-control functions, but they are not a complete glute program. Combine them with a squat or lunge, a hip hinge, and a bridge or hip thrust.
What is the difference between a glute bridge and a hip thrust?
A bridge keeps your upper back on the floor. A hip thrust elevates the upper back on a stable support and usually allows more hip movement. Bridges require less equipment and are easier to set up; hip thrusts offer more loading and range options when performed safely.
Why do I feel glute exercises in my hamstrings or thighs?
Many glute exercises are compound movements, so the hamstrings and quadriceps should contribute. If another muscle completely limits the exercise, reduce the resistance, adjust foot placement or range, and slow the repetition. Pain is different from normal muscular work and should not be ignored.
Can I train my glutes with bands every day?
Daily hard training is unnecessary for most people. Muscles and connective tissues need time to recover, and performance may decline if every session is demanding. Easy movement practice can be more frequent, but hard sets are better organized into planned sessions.
Will resistance band glute exercises reduce hip or thigh fat?
No exercise selectively removes fat from the area it trains. Band exercises can strengthen the underlying muscles, while changes in body fat depend on overall energy balance and other individual factors. Genetics also influence body shape and where fat is stored.
Are fabric bands better than latex bands?
Neither material is universally better. Fabric mini bands often roll less during lower-body exercises, while latex bands usually stretch farther and come in more shapes. Choose a well-made product that suits the movement, inspect it regularly, and avoid latex if you have a known allergy.
Practical Recommendations
For a simple starting plan, complete Workout A or B twice weekly for four weeks. Write down your setup and repetitions, stop most sets with one to three controlled repetitions left, and progress only after you reach the top of the range.
Choose the mini-band workout if you have limited equipment or want a short accessory session. Choose the long-band workout if your main goal is building glute and lower-body strength at home. If the stronger band ruins your technique, return to the lighter one and use slower repetitions or a small rep increase instead.
Conclusion
Resistance band glute exercises can support meaningful strength and muscle gains, but the program needs more than a collection of high-repetition burnout drills. Build your sessions around a squat or lunge, a hip hinge, and a bridge or hip thrust. Then add one or two abduction exercises for complete glute training.
Start with the band you can control, record your work, and progress gradually. If bands eventually stop providing enough resistance, combining them with dumbbells or other equipment is a sensible next step—not a sign that the band workouts failed.
Next step: Pick one workout, note your starting band and repetitions, and repeat the session for several weeks before judging your progress.