
To anchor resistance bands at home, use specially designed door anchors, professionally installed wall anchors, manufacturer-approved straps around a stationary pole, or your feet for self-anchored exercises. Before applying full resistance, test each component, secure the attachment point, and test the setup with a light pull.
Never attach a band to a door handle, lightweight furniture, exposed hook, pipe, or other object that could move or break. A stretched band stores energy and can recoil rapidly if the anchor, handle, clip, or band fails.
What Is the Safest Way to Anchor Resistance Bands at Home?
The safest method is a compatible, purpose-built anchor attached to a structure that can withstand the direction and amount of force you will apply. For many home users, that means a padded door anchor used exactly as its manufacturer directs.
No anchor is automatically safe in every home. You must consider four parts of the setup:
- The band: Is it undamaged and suitable for the exercise?
- The connection: Is the band threaded or clipped to the anchor correctly?
- The anchor: Is it designed for resistance band exercise?
- The structure: Can the door, wall, rack, or post remain stable under tension?
Manufacturer instructions take priority over generic online advice. One door anchor may be designed for the hinge edge, while another may be approved for the top or bottom of a closed door. Do not assume these products are interchangeable.
The American Council on Exercise recommends inspecting bands and handles before every use and discarding or not repairing bands with cuts, cracks, punctures, or other damage. It also warns against releasing a band while it is stretched or exceeding the manufacturer’s permitted stretch range. (American Council on Exercise)
Four Safe Resistance Band Anchoring Methods
1. Purpose: Built Door Anchor
A resistance band door anchor is generally the simplest portable attachment for rows, presses, pulldowns, and other anchored exercises. It normally consists of a padded stopper, a durable strap, and a loop or attachment point.
Use an anchor designed for your type of tube band, loop band, or flat exercise band. The product instructions should state which band styles and resistance levels it supports.
Advantages:
- Portable and easy to store
- Provides multiple exercise angles
- Requires no permanent structural changes
- Usually works with many tube band exercises.
Limitations:
- Not every door is strong enough.
- The door may be damaged if it is weak or the anchor is used incorrectly.
- Someone could open the door.
- Placement rules vary between anchor models.
2. Professionally Installed Wall Anchor
A resistance band wall anchor can provide consistent high, middle, and low attachment points for frequent training. It must be designed for exercise and installed into appropriate structural support using the specified hardware.
Do not attach an exercise anchor to drywall alone unless the complete system is specifically engineered and approved for that installation. Dynamic pulling produces different forces from simply hanging a lightweight object. (Administration, n.d.)
For example, the installation manual for one commercial wall system specifies mounting its units to wood studs with particular lag screws. That instruction applies to that system, not necessarily to another product. (Hammer Head Anchor Gym manual)
If you are unfamiliar with wall construction or are under 18, ask a qualified adult or professional installer to handle the installation.
3. Manufacturer-Approved Strap Around a Fixed Post
Some resistance bands include an anchor strap that can wrap around a stable rack, post, or similar fixed structure. Use this method only when the band manufacturer approves it.
A suitable structure should be:
- Permanently stable in every pulling direction
- Strong enough for the expected force
- Free from rust, splinters, and sharp edges
- Wide enough that the strap cannot slide off
- Positioned where the band cannot rub against an abrasive surface
Place the protective strap against the structure rather than wrapping bare latex directly around a rough edge. Do not use an unfamiliar outdoor railing, fence, signpost, or tree simply because it looks sturdy.
4 Self-Anchoring Under the Feet
Many exercises do not require a door attachment or fixed structure. You can create a home resistance band attachment by standing on the center of a suitable band.
Common self-anchored exercises include
- Biceps curls
- Squats
- Overhead presses
- Good mornings
- Romanian deadlifts
- Lateral raises
- Seated rows, when the band is designed for that setup
Place the band securely under the middle of the foot and wear stable footwear. Keep your feet planted and begin with modest starting tension. Do not stand on a handle, carabiner, or hard connector unless the product instructions explicitly allow it.
How to Attach Resistance Bands to a Door
Use the following process only with a purpose-built door anchor. Your product manual may require a different placement or connection method, so read it before beginning.
Step 1: Inspect the Equipment
Check the complete resistance band door anchor setup, including:
- Band surface
- Fabric sleeves
- Handles
- Connection straps
- Stitching
- Carabiners or clips
- Attachment loop
- Anchor strap
- Padded stopper
Do not use the system if you notice cuts, thinning, cracks, punctures, loose stitching, deformed clips, damaged padding, or discoloration that may indicate deterioration.
The ends of tube bands and the points where handles connect deserve particular attention because these areas experience repeated stress.
Step 2: Check the Door and Frame
Use a sturdy door that closes completely without excessive movement. Check the hinges, frame, latch, and lock before attaching the band.
Reject the location if:
- The door or frame is cracked.
- A hinge is loose
- The latch does not hold
- The door flexes noticeably.
- The anchor prevents the door from closing fully.
- The frame shifts when light pressure is applied.
- You cannot prevent someone from opening the door.
A hollow or lightweight interior door may be more vulnerable to damage than a solid, well-maintained door. (Sansone, 2024) If you cannot determine whether the door and frame are suitable, choose a different anchoring method.
Step 3: Position the Door Anchor Correctly
Place the padded stopper on the opposite side of the closed door and position the attachment loop toward your exercise. Fully seat the stopper so it cannot slip through the gap in the door.
Some manufacturers direct users to place the anchor along the hinge side and prohibit top, bottom, and latch-side placement. For example, GoFit’s instructions specify hinge-side placement and require the door to be locked. (GoFit door anchor instructions)
Other attachments are designed specifically for the top or bottom of a door. Use those positions only if the instructions for your exact model permit them.
Whenever possible, exercise from the side where pulling the band draws the door more firmly into its frame rather than pulling it open. If that position is unavailable, do not invent a workaround; and follow the product’s approved alternative or use another anchor point.
Step 4: Close, Latch, and Lock the Door
Close the door completely and confirm that the latch engages. Lock it whenever a lock is available.
Prevent other people from opening the door. Tell everyone nearby that the door is being used for exercise and keep children and pets away from the workout area.
Step 5: Connect the Band as Directed
Some anchors require you to thread a flat band or loop band through a fabric loop. Tube systems may use a clip, Dring, or another dedicated connector.
Make sure:
- The band and anchor are compatible.
- Every clip closes completely.
- The band lies flat rather than twisted.
- Latex does not rub against the door edge.
- The connection aligns with the direction of pull.
- The anchor is not pinching or cutting the band.
Never substitute a random carabiner unless it is approved for the system. Do not clip metal hardware directly through a latex band unless the equipment was designed that way.
Step 6: Perform a Low-Tension Anchor Test
Stand close to the anchor and remove the slack slowly. Apply light, steady tension while watching the door, anchor, clips, and band.
Stop if you notice:
- Movement in the door or frame
- The stopper shifting toward the door gap.
- A clip opening or rotating unexpectedly
- Fabric stretching or stitching separating.
- The band rubbing against a sharp surface
- Unusual sounds
- Unpredictable slipping
A resistance band anchor test is a controlled check, not a forceful yank. Passing a light-tension check does not justify exceeding the manufacturer’s resistance or stretch limits.
Step 7: Move Out of the Recoil Path
Position your body so your face and eyes are not directly in line with the stretched resistance band or attachment hardware. Increase tension gradually and perform each repetition smoothly and under control.
Never adjust a handle, clip, or anchor while the band is stretched. Walk toward the anchor to reduce tension before changing anything.
Which Side of the Door Should a Band Anchor Go On?
Use the side and location specified by the anchor manufacturer. Many portable anchors require placement along the hinge edge because the hinges can help limit movement, while some specialized designs are approved for the top or bottom of the door.
The safest general setup usually has three characteristics:
- The padded stopper is fully trapped behind the closed door.
- The door is locked and cannot be opened by another person.
- The direction of resistance pulls the door into its frame rather than open.
Do not position a standard anchor on the latch edge, over the top, or beneath the door unless its instructions specifically approve that position.
What Height Should Resistance Bands Be Anchored?
Choose the anchor height according to the direction of resistance required by the exercise. The band should challenge the intended movement without forcing you into an unstable position.
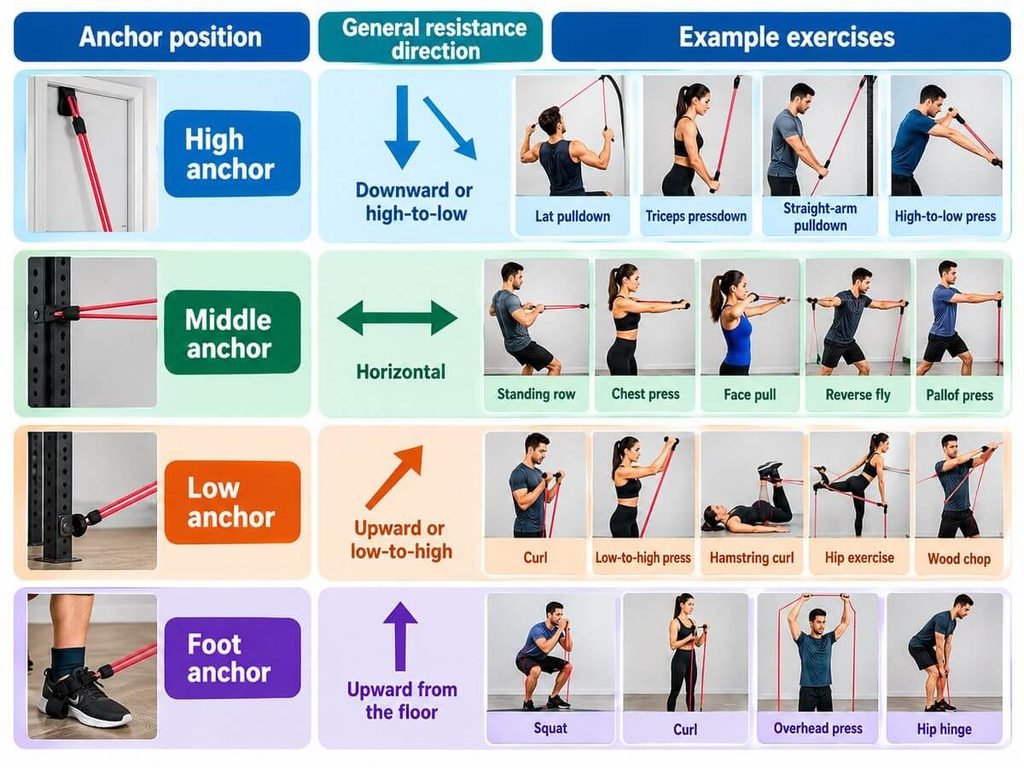
These positions are starting points rather than exact measurements. Your height, band length, exercise technique, and intended line of pull affect the best placement.