Resistance bands can provide a complete beginner strength workout without a rack, bench, or set of weights. The plan below trains the legs, hips, chest, back, shoulders, arms, and core in about 25–35 minutes. Start with Workout A twice per week. Add Workout B once the movements feel familiar or use the two sessions in rotation.
Most of the exercises require only one long loop band or a tube band with handles. The main routine does not require a door anchor. That makes it easier to start and removes one common setup concern.
Bands are not merely warm-up tools. A systematic review and meta-analysis found that elastic resistance produced strength gains similar to conventional resistance when the programs were comparable. Results still depend on consistent training, sufficient effort, and gradual progression—not the equipment alone. 1
Safety note: This workout is written for generally healthy adults. If you have a current injury, significant pain, a condition that affects exercise tolerance, or medical restrictions, ask an appropriate health professional how to modify the plan. Stop if an exercise causes sharp pain, chest pain, faintness, or other unusual symptoms.
Beginner Resistance Band Workout at a Glance
Start with Workout A on two nonconsecutive days each week. Complete the exercises in order, rest as needed, and prioritize repeatable technique over speed. One round means one set of every exercise; two rounds provide two sets.
Routine A summary
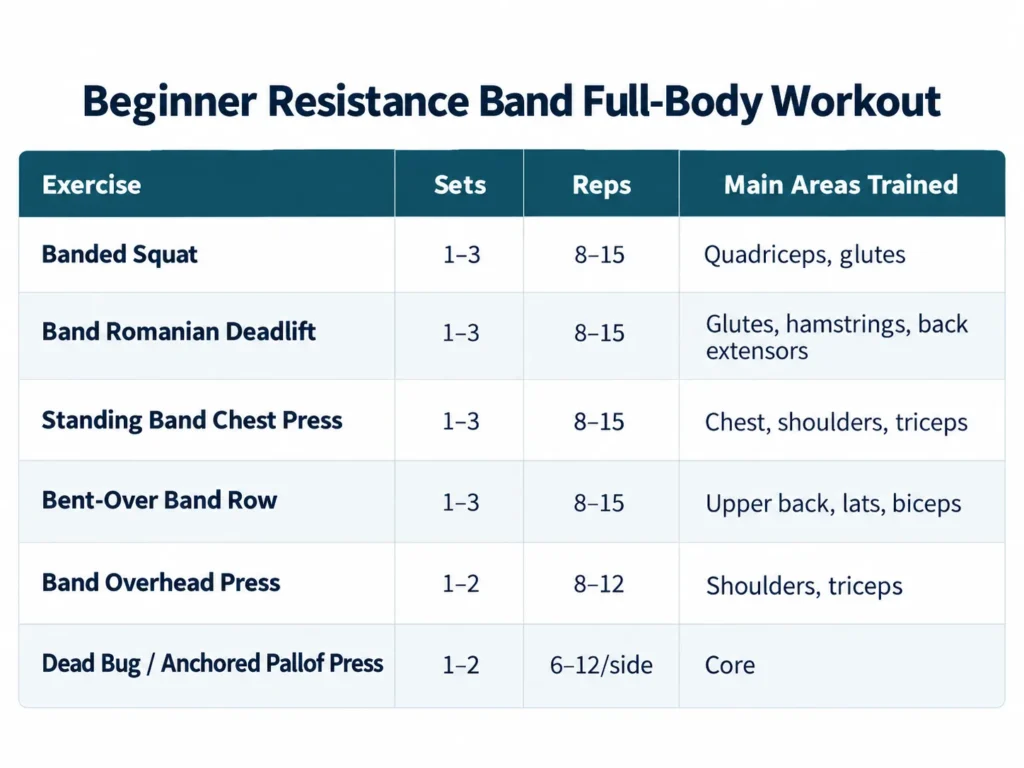
Rest: About 60–120 seconds between sets or exercises. Take longer if breathing or fatigue prevents controlled technique.
Starting point: During your first week, one set of each exercise is enough to learn the movements. If that feels manageable and you recover normally, use two sets in the following weeks.
Routine B summary
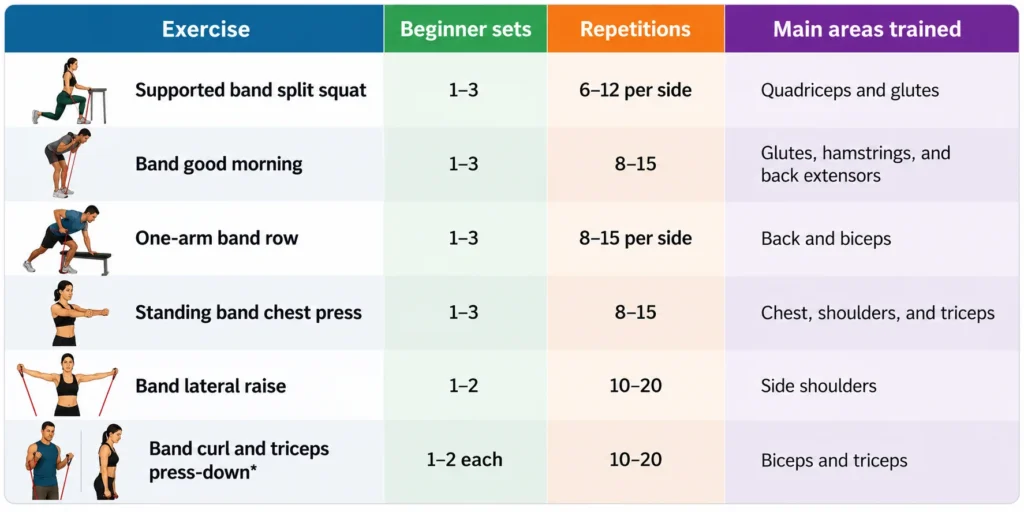
*Use an overhead triceps extension if you do not have a secure high anchor for the press-down.
Workout B is optional at first. It adds unilateral work—one side at a time—and a little direct arm training, but it is not automatically better than repeating Workout A. Beginners often improve faster when they practice a small number of movements consistently.
Why Resistance Bands Work for Strength Training
Resistance bands challenge muscles with external force, just as free weights and machines do. The key difference is that band tension usually increases as the band stretches, so an exercise often feels lightest near the beginning and hardest near the end of the movement.
This variable resistance has practical consequences. A band curl may feel manageable with the elbow straight but much harder near the top. A squat may provide little tension at the bottom and considerably more as you stand. Adjusting the band, your stance, or the exercise can improve the resistance profile, but no setup needs to feel equally difficult at every joint angle to be useful.
Research comparing elastic resistance with conventional equipment has generally found that bands can improve strength. The evidence does not show that bands are universally superior, and the quality and size of the evidence base have limitations. A sensible conclusion is that bands are a legitimate option when the exercises can be loaded progressively and performed with sufficient effort.
Updated guidance from the American College of Sports Medicine also emphasizes that equipment and complex programming matter less than regular participation. Its 2026 position stand found that home-based training and elastic bands can improve strength, muscle size, and physical function.
What Equipment Do You Need?
One long loop band is enough for the main workout. A set with several resistance levels is more convenient because your legs will usually tolerate more resistance than your shoulders and arms.
Long loop bands
Long continuous loops are the most versatile choice for this plan. You can stand on them, hold them, wrap them around your upper back, or attach them to a suitable anchor. They work well for squats, hinges, rows, presses, and assisted bodyweight exercises.
Tube bands with handles
Tube bands can make curls, rows, and presses more comfortable to hold. Some sets include door anchors and ankle straps. Check every handle, clip, seam, and attachment before training, and follow the manufacturer’s setup and maximum-stretch instructions.
Flat therapy bands
Flat bands are easy to grip at different lengths, which makes small resistance adjustments simple. They can work for most exercises in this article, although rolling or hand discomfort may become limiting with stronger tension.
Mini loop bands
Short mini bands are useful for lateral walks, glute bridges, hip abduction, and some shoulder exercises. They are less suitable as the only equipment for a balanced full-body routine because pulling and pressing options are limited.
Optional equipment
- A sturdy chair or wall for balance
- A nonslip exercise mat
- A purpose-made door anchor that is compatible with your band
- Eye protection if recommended by the band manufacturer or if rebound risk is a concern
- A notebook or phone log for recording exercises, band choice, setup, and repetitions
How to Choose the Right Resistance Band
Choose resistance by the quality and difficulty of the set, not by the band color. For most exercises in this plan, the correct band allows at least eight controlled repetitions and makes the final few repetitions challenging without changing your form.
Use this four-part test:
- You can reach the minimum repetition target. If you cannot complete eight controlled repetitions, reduce the resistance or use an easier setup.
- You can use the intended range of motion. A band is too strong if it forces you to shorten the movement substantially.
- Your body position stays stable. Leaning, twisting, bouncing, or shrugging to finish the set suggests the resistance may be excessive.
- You finish with about two or three good repetitions left. The set should feel productive, but a beginner does not need to reach complete muscular failure.
The correct resistance will vary by exercise. You may use a heavy band for a squat, a medium band for a row, and a light band for a lateral raise. This is normal.
Why the printed resistance rating can be misleading
A label such as “20 pounds” may refer to tension at one specific amount of stretch. Actual tension changes with band length, how far you stretch it, where you grip it, and how the manufacturer measured it. Two bands with the same printed rating may not feel identical.
For consistent tracking, record practical details instead:
- Brand and band color
- Where you placed your feet
- Where you gripped the band
- Whether the band was doubled
- Repetitions completed
- Estimated repetitions in reserve
This record is more useful than trying to convert every exercise into an exact weight.
Five-Minute Warm-Up
A short warm-up should raise your temperature, move the joints you will train, and let you practice the first exercises with little resistance. It should prepare you without creating significant fatigue.
Complete the following sequence:
| Movement | Time or repetitions |
|---|---|
| Easy marching or walking in place | 60 seconds |
| Bodyweight squat to a comfortable depth | 8 repetitions |
| Unloaded hip hinge | 8 repetitions |
| Arm circles | 8 in each direction |
| Light band pull-apart | 8–12 repetitions |
| Practice squatting and rowing with a light band | 5 repetitions each |
Move gradually. A warm-up is not a test of flexibility, and you do not need aggressive stretching before lifting. If a particular joint feels stiff, add a few comfortable practice repetitions rather than forcing it.
Workout A: Full-Body Foundation
Workout A teaches six basic patterns: squat, hinge, push, pull, overhead press, and trunk control. Perform every repetition smoothly and stop the set when your form starts to change.
1. Banded squat
The banded squat trains the thighs and glutes. For a beginner, the most stable setup is to stand on the center of a long band and hold the sides near shoulder level.
How to do it
- Place both feet on the band approximately hip- to shoulder-width apart.
- Hold the band at shoulder height. Keep your hands close enough to create tension but not so tight that you cannot stand upright.
- Brace your midsection gently and keep the whole foot in contact with the floor.
- Bend your knees and hips together, sitting down between your legs to a comfortable depth.
- Push the floor away and stand tall without forcefully leaning back.
Useful cues: Keep your knees generally moving in the same direction as your toes. Maintain a stable foot rather than rolling onto the inner or outer edge. Use a depth you can control; there is no requirement to squat below parallel.
Make it easier: Remove the band and practice a bodyweight squat on a chair. You can also hold a stable support with one hand.
Make it harder: Use a stronger band, shorten the band by widening your stance slightly, add repetitions, or pause briefly near the bottom.
Common error: Pulling the band upward with the arms. Your hands hold the band in place; your legs should perform most of the work.
2. Band Romanian deadlift
The Romanian deadlift trains the glutes and hamstrings while teaching a hip hinge. The goal is to move at the hips while keeping the spine in a comfortable, controlled position.
How to do it
- Stand in the center of the band with feet about hip-width apart.
- Hold one side of the band in each hand. Stand tall with the band tensioned.
- Soften your knees slightly and keep that knee angle relatively steady.
- Push your hips backward as your torso inclines forward. Keep the band close to your legs.
- Stop when you feel tension in the hamstrings or before your back position changes.
- Drive your feet into the floor and bring the hips forward to stand.
Useful cues: Imagine closing a car door with your hips. Keep your neck aligned with your torso and your ribs stacked over your pelvis.
Make it easier: Use a light band or practice the hinge without resistance while touching your hips to a wall behind you.
Make it harder: Use a stronger band, hold the band lower to increase starting tension, or progress to a staggered-stance Romanian deadlift.
Common error: Turning the movement into a squat. Some knee bend is fine, but the hips should travel backward more than downward.
3. Standing band chest press
The standing band chest press trains the chest, front shoulders, and triceps without a bench or anchor. A long loop band can wrap across the upper back and under the arms.
How to do it
- Pass the band behind your upper back, keeping it below the neck and away from bare skin if friction is uncomfortable.
- Hold one side in each hand with elbows bent and hands near chest level.
- Use a staggered stance for balance and brace your trunk.
- Press your hands forward until the elbows are comfortably straight.
- Return slowly. Do not allow the band to pull your arms backward suddenly.
Useful cues: Keep the wrists fairly straight. Let the shoulder blades move naturally rather than pinning them together throughout the press.
Make it easier: Use a lighter band or a banded wall push-up setup.