
Affiliate disclosure: This article contains an affiliate link. If you purchase through it, the site may earn a commission at no extra cost to you. Recommendations should be based on usefulness, not commission.
You can complete an effective home workout with just a mat by combining squat-push-up variations, glute bridges, single-leg exercises, core-stability movements, and low-impact conditioning. The mat adds comfort and grip, while your body weight, exercise choice, range of motion, and effort create the training stimulus.
The beginner routine below takes about 20–30 minutes, uses no weights, and trains most major muscle groups. It also includes easy modifications and a clear progression system, so you can start at your current ability instead of forcing advanced exercises.
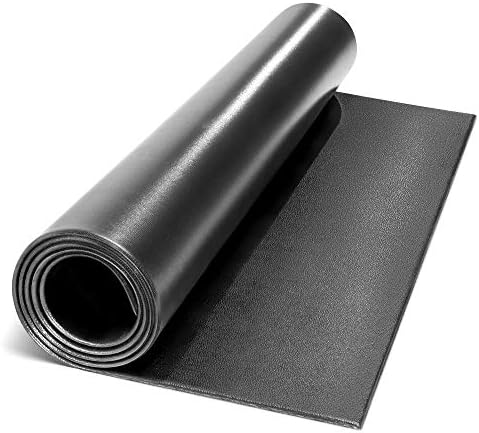
- HIGH-IMPACT FOAM SURFACE– Constructed from premium 1/4-inch EVA foam, this gym mat boasts a sturdy construction that res…
- ABSORBS IMPACT – Created as a reliable gym accessory that will help enhance your training, this protective flooring has …
- STABILIZES MACHINES–A matte layer delivers firm placement of exercise machines and features a premium material blend tha…
Can You Get Fit With Only an Exercise Mat?
Yes. A structured bodyweight routine can build strength, muscular endurance, movement control, and general fitness without gym equipment. The key is to perform exercises that are challenging for you and gradually increase the demand as you improve.
The American College of Sports Medicine’s 2026 resistance training guidance states that bodyweight exercises and home-based training can be effective. It also emphasizes that regular participation matters more for most healthy adults than complicated programming or a particular type of equipment.
Research offers a more specific example. In a small eight-week study of trained young men, load-matched push-up and bench press programs produced similar increases in chest and triceps muscle thickness and comparable strength improvements. This does not prove that every bodyweight exercise equals every weighted exercise, but it shows that sufficiently challenging push-ups can provide a meaningful training stimulus (Kikuchi & Nakazato, 2017).
A separate study found that brief bodyweight interval sessions improved cardiorespiratory fitness in inactive adults over six weeks (Archila et al., 2021). The routine used vigorous intervals, so beginners should not assume they need to copy that intensity. The practical lesson is that equipment-free movement can challenge both muscles and the cardiovascular system when programmed appropriately.
What the mat does and does not do
An exercise mat provides cushioning, defines your workout area, and may improve traction. It does not create resistance by itself. Your muscles respond to the challenge produced by:
- Your body weight
- Leverage and exercise variation
- Range of motion
- Movement speed and control
- Number of hard repetitions and working sets
- Rest periods
- Consistency over time
The main limitation of a mat-only workout
A workout with only a mat makes horizontal pushing easy to train through pushups, but strong pulling movements are difficult without something safe to pull against. Prone W raises and reverse fly variations can work the rear shoulders, upper back, and spinal stabilizers, but they do not fully replace loaded rows, pulldowns, or pull-ups.
Do not improvise with an unstable door, table, chair, or homemade anchor. If back development becomes a priority, a properly secured resistance band or suitable pulling station is a more practical next step.
What You Need Before Starting
You need enough clear floor space to lie down and extend your arms and legs. A mat is useful, but a stable surface, safe surroundings, and a routine matched to your ability matter more than accessories.
Use this quick setup checklist:
- Clear furniture, cords, toys, and other objects from the workout area.
- Place the mat on a level, dry floor.
- Check that the mat does not slide when you press a hand or foot into it.
- Keep water nearby.
- Wear clothing that allows comfortable movement.
- Use supportive footwear for standing movements if it helps you feel more stable.
- Keep a folded towel available if your knees need extra cushioning.
Yoga mat or fitness mat: which is better?
Either can work. Choose based on traction, stability, and comfort rather than the product label.
| Feature | Thinneryoga-style mat | Thicker fitness mat |
|---|---|---|
| Standing balance | Usually firmer and more stable | May feel less stable if very soft |
| Floor comfort | Less cushioning | More cushioning for knees, hips, and elbows |
| Portability | Usually lighter and easier to roll | Often bulkier |
| Best use | Mixed standing and floor work | Mostly floor-based, low-impact exercise |
A very soft mat can compress or shift during lunges, single-leg work, or fast conditioning. If you want an option for home training, you can view this exercise mat and compare its dimensions, thickness, surface texture, and return policy with your needs. Inspect the current product listing before recommending specific features, because product details can change.
The Best Exercises to Do at Home on a Mat
The best full-body mat exercises cover different movement patterns rather than repeating many variations for one area. The following eight movements create a balanced beginner routine within the limits of no-equipment training.
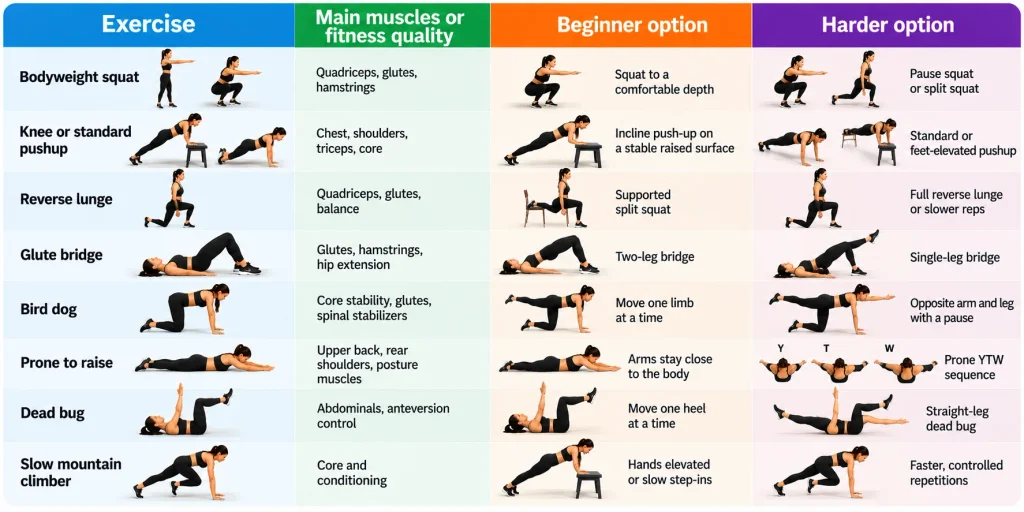
This exercise selection includes knee-dominant lower-body work, single-leg movement, hip extension, horizontal pushing, core stabilization, posterior chain work, and conditioning. That is more complete than a routine made entirely of crunches, planks, and leg raises.
Beginner Home Workout With Just a Mat
Perform this routine two or three nonconsecutive days per week to start. Complete one round if you are new to exercise, or two rounds if you can maintain good technique. Rest long enough to make the next set controlled.
1. Warmup: 4–5 minutes
A short warmup should gradually raise your heart rate and rehearse the movements you are about to perform. It does not need to be exhausting.
Complete:
- March in place: 45–60 seconds
- Arm circles: 20–30 seconds in each direction
- Controlled hip hinges: 8 repetitions
- Squat to reach: 6–8 repetitions Cat-cow: 5–6 slow repetitions
- Alternating reverse step without lowering deeply: 5 per side
2. Full-body circuit
Move through the exercises in order. Rest about 30–60 seconds between exercises and 60–90 seconds after the round. Longer rest is fine if it helps you keep steady technique.

Starting volume: One round during your first few sessions may be enough. Progress to two rounds when you finish with stable form and feel recovered before the next planned session. A third round is optional for experienced beginners; it is not required for the workout to count.
3. Cooldown: 3–5 minutes
Use the cooldown to let your breathing settle and move through comfortable ranges. Try relaxed breathing, a gentle child’s pose if it feels good, a kneeling hip flexor stretch, and an easy chest-opening position. Do not force a joint into a painful range or treat the cooldown as a flexibility test.
How to Perform Each Mat Exercise
The technique should make the intended muscles work while keeping the movement controlled and repeatable. Use the easiest variation that lets you complete the set without losing your position.
Bodyweight squat
The bodyweight squat trains the thighs and glutes while developing a basic sit-to-stand pattern. Use a comfortable stance and squat only as deep as you can control.
- Stand with your feet around hip-to-shoulder-width apart.
- Gently brace your midsection and keep your whole foot in contact with the floor.
- Bend your knees and hips together as if sitting between your heels.
- Keep your knees tracking generally in the same direction as your toes.
- Press through your feet to stand tall without snapping the knees backward.
Make it easier: Reduce the depth or lightly touch a stable chair behind you.
Make it harder: Pause for two seconds near the bottom or use a controlled three-second lowering phase.
Pushup variation
Pushups train the chest, shoulders, triceps, and core. The correct variation is the one that allows your torso and hips to move as one unit through a pain-free range.
- Place your hands slightly wider than shoulder-width.
- Create a straight line from your head through your hips and knees or heels.
- Bend your elbows and lower your chest under control.
- Keep your elbows angled back rather than flared directly to the sides.
- Press the floor away and return to the start.
Make it easier: Place your hands on a stable counter or sturdy raised surface. An incline pushup often makes it easier to preserve a straight body line than a poorly controlled floor pushup.
Make it harder: Move from incline to knee pushups, then to standard pushups, provided each stage stays controlled.
Reverse lunge or supported split squat.
This single-leg pattern trains the thighs and glutes while challenging balance. A supported split squat is a good first step if moving backward feels unsteady.
- Stand tall and step one foot backward.
- Lower both knees within a comfortable range.
- Keep most of the front foot planted and the front knee tracking with the toes.
- Push through the front foot to return to standing.
- Complete all repetitions on one side or alternate sides.
Make it easier: Hold a wall lightly for balance and use a shorter range of motion.
Make it harder: Slow the lowering phase or perform a stationary split squat with a pause.
Glute bridge
The glute bridge trains hip extension through the glutes and hamstrings. The movement should come mainly from the hips rather than an exaggerated arch in the lower back.
- Lie on your back with your knees bent and feet flat.
- Place your feet about hip-width apart.
- Gently tighten your midsection.
- Press through your feet and lift your hips until your torso and thighs form a comfortable line.
- Pause briefly, lower with control, and repeat.
Make it easier: Use a smaller range of motion.
Make it harder: Add a longer pause at the top, move the feet slightly farther away, or progress to a single-leg bridge only when you can keep the pelvis level.
Bird dog
The bird dog builds trunk stability while the arms and legs move. The goal is to resist twisting or arching, not to lift the limbs as high as possible.
- Start on your hands and knees, with your hands under your shoulders and knees under your hips.
- Brace your abdomen gently.
- Extend one leg behind you without rotating your pelvis.
- Return slowly and change sides.
- When ready, extend the opposite arm and leg together.
Make it easier: Move only one leg or one arm at a time.
Make it harder: Hold the extended position for two or three seconds without shifting.
Prone W raise
Prone W raises train parts of the upper back and rear shoulders with no equipment. They are useful within an amat-only plan, although they are not a replacement for a loaded pulling exercise.
- Lie face down with your forehead hovering just above the mat or resting on a folded towel.
- Bend your elbows so your arms form a W shape.
- Keep your neck long and gently lift your hands and elbows away from the floor.
- Draw your shoulder blades back and slightly down without shrugging.
- Lower slowly.
Make it easier: Keep the arms close to the torso and use a small lift.
Make it harder: Move through a slow YTW sequence while keeping the neck relaxed.
Dead bug
The dead bug trains the abdominals to limit unwanted arching of the lower back as the limbs move. Choose a range that lets you keep steady trunk control.
- Lie on your back with your hips and knees bent.
- Reach your arms toward the ceiling.
- Gently brace your abdomen and keep your lower back in a comfortable, stable position.
- Lower one heel toward the floor, then return.
- Alternate sides. Progress to moving the opposite arm and leg together.
Make it easier: Tap one heel down at a time while keeping the knees bent.
Make it harder: Straighten the moving leg or extend the limb farther, but stop before your back position changes.
Slow mountain climber
Slow mountain climbers allow low-impact conditioning and core work. Speed is optional; control comes first.
- Begin in a high plank with hands under or slightly ahead of the shoulders.
- Keep your body in a long line.
- Step one knee forward without bouncing the hips.
- Return the foot and switch sides.
- Maintain a pace that lets you breathe rhythmically and keep your hands secure.
Make it easier: Place your hands on a stable counter or replace the movement with brisk marching.
Make it harder: Increase the pace slightly while keeping the trunk controlled.
How to Progress a Mat Workout Without Weights
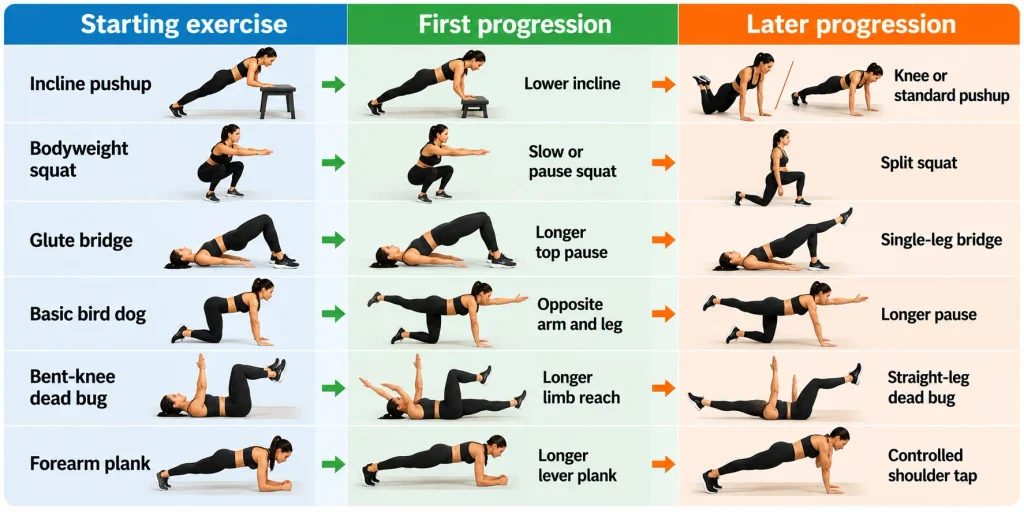
Progressive overload means gradually increasing the challenge placed on your body. Without weights, you can create overload by changing repetitions, sets, leverage, tempo, range of motion, rest, or exercise variation.
Use one progression at a time:
- Improve technique first. Make each repetition consistent and controlled.
- Add repetitions. Move toward the top of the suggested range.
- Add a set or round. Increase total training volume only if recovery remains good.
- Slow the lowering phase. Take about three seconds to lower during squats, pushups, or lunges.
- Add a pause. Hold the most difficult controlled position for one or two seconds.
- Increase the range of motion. Use more range only when it remains comfortable and stable.
- Choose a harder variation. Progress from bilateral to single-limb work or from an incline to a lower pushup position.
- Shorten rest for endurance. Reduce rest gradually only if conditioning is the goal and form stays steady.
How hard should a set feel?
Most sets should feel challenging near the end while still leaving you able to complete another clean repetition or two. You do not need to reach complete muscular failure on every set. The ACSM’s 2026 position stand found that training to momentary failure did not consistently improve results for the average healthy adult.
If you reach the top of the repetition range and could perform many more clean reps, the movement is probably too easy for strength or muscle-building purposes. Select a harder variation instead of extending every set indefinitely.
How Often Should You Perform a Mat Workout?
Most adult beginners can perform this full-body routine two or three times per week on nonconsecutive days. That schedule provides regular practice while allowing recovery between challenging sessions.